
2-3 years back I did not know the difference between biryani and pulav. I thought biryani has a different masala called “biryani masala”, but the method for both are same. We were in San Diego for a small business trip and one of my colleagues always prepared biryani on the similar lines as pulav. It definitely tasted great. But then, our manager (who is a Gujrathi but settled here in US), always said ‘what you people make cannot be called biryani’. I never got any chance to see how he makes biryani. But when I returned to India, I went to Belgaum and made sure to learn the biryani from my Pachi’s cook. Her biryani is just amazing.
Here I’ve noted down tips and tricks on “How to make Biryani / Biriyani”, detailed description and step by step pictures/photos with instructions.
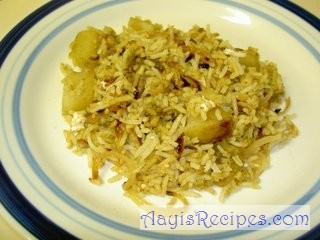
While cooking biryani, the rice is cooked separately and alternative layers of vegetables/meat and rice is arranged and cooked on a very low flame for a long time. The best biryanis have each grain separate. They tend to be more dry compared to pulavs. Read here for more information about biryani. Biryanis can be broadly classified in two – Kutchi(raw) biryani – where the meat/vegetables are layered between semi cooked rice. For ex: Belgaum style biryani . – Pakki(cooked) biryani – where cooked meat/vegetables are layered between semi cooked rice. For ex: Biryani with ‘biryani mix’
As I said earlier, biryanis have 2 or more than two layers of meat/vegetables and rice. But I have noticed that, the biryani cooked in Belgaum has only one layer of raw meat/vegetable at the bottom. Then there are layers of rice topped with biryani masala, fried onion. This may be what they followed from generations, but I absolutely love this. It is possible that to cook the meat fast and evenly they put only one layer so that the rice gives the desired weight to cook it faster(thats just a guess).
Here I give some general steps of making biryanis. I will not give any recipe, because these steps are useful with any biryani recipe.
– Cook basmathi rice with water, salt and 2 drops of oil till rice is 3/4th done. A few whole spices are usually added while cooking the rice. Note that rice should NOT be completely cooked. Drain water from the rice and if required, run it through cold water to separate the grains.


– Prepare the masala, for the ‘kutchi biryani’, fry all spices and meat/vegatetable in oil till a nice aroma comes out. Do not cook the meat/vegetables completely. For ‘pakki biryani’, fry the spices and meat/vegetable in oil and then cook it till the meat is completely done.


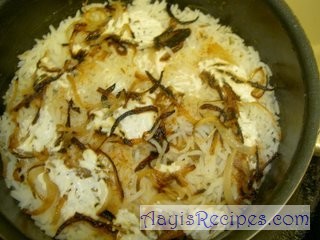
– Heat oil and fry onion slices till they turn brownish. Take out the onion from the oil on a paper towel.


– Soak saffron or the biryani color in warm water.
– Divide the meat/vegetable mixture in 2 or more portions. Divide the rice in same number of portions.
– Take a thick bottomed pan and heat ghee/oil. Add one portion of the meat/vegetable mixture. Cover with a layer of rice. On top of rice spread a layer of fried onion and soaked color/saffron (Some people add the onion and color layer only on the top). Arrange all the meat/vegetable and rice layers. Spread fried onion and color on top. If desired, spread a table spoon of well beaten yougurt/curd on top.


– Add some(around 1tbl spn) ghee/oil on top, add 1 cup of water(for 1 cup rice). Cover well and cook on a very low flame. After some time, when the grains have almost cooked (the grains would have become bigger). Heat a tava and keep the biryani vessel on the tava. Cook on a low flame again till the meat/vegetable and rice is completely done (if required, add only a little water, too much water makes the biryani mushy).

– Serve hot with raita or mint chutney.
PS : Do not try making biryani in a hurry. It comes out great when it is cooked on a low flame for a long time. Do not use cooker for making biryanis. In the above pictures, I have spread some biryani masala along with fried onions and have not used the color. I used the extra masala for the extra flavor. The two recipes where you can follow this method are this and this .

I love eggs in any dish. I have a book named “Egg recipes” by Mrs S. Malika Badrinath. It is a treasure of egg recipes. I tried many recipes from this book and loved them all. The name of this dish is given as “Andhra egg curry”. I am not sure if it is an authentic Andhra recipe or something prepared on the similar lines of any other Andhra curries. So I chose to ignore that name :).
This curry had an amazing taste. Even while cooking it, the aroma was too good. The entire house was filled with the aroma.
Ingredients: Eggs(boiled) 3 Onion 1 Garlic pods 1 (if using Indian garlic, use 2-3) Tamarind extract(thick) 1/2 tea spn Sambar powder( recipe given below ) Mustard seeds 1/2 tea spn Chana dal 1/2 tea spn Urad dal 1/2 tea spn Curry leaves 4-5 Coriander leaves 3-4 strands Salt
Sambar powder Red chilies 4-5 Coriander seeds 1 tea spn Urad dal 1 tea spn Chana dal 1 tea spn Dry coconut 1 tbl spn Oil 1 tea spn Mustard seeds 1/2 tea spn Fenugreek seeds 1/2 tea spn
Method: Remove the shell of eggs and put some slits on it. Heat oil and fry the sambar powder ingredients(except mustard and fenugreek seeds). Dry roast mustard, fenugreek seeds. Powder them coarsely. Heat oil and add mustard seeds. When they start popping, add urad dal, chana dal and curry leaves. Add chopped garlic, onions and fry till they are translucent. Add tamarind extract, sambar powder and 1 cup water. Add the eggs, salt, chopped coriander and cook till the gravy becomes thick. Serve with chapathi.
Serves : 2 Preparation time : 30mins
